前言
随着美图贴贴,天天P图,in的火热,越来越多的人喜欢贴图,朋友圈里的好友尤其是妹子喜欢把照片贴上各种搞怪或呆萌的道具。去年公司说要做一款主打原创素材的贴图应用,BB猪满怀欣喜的接下了这个任务,现在把贴图功能的具体实现分享出来。
需求
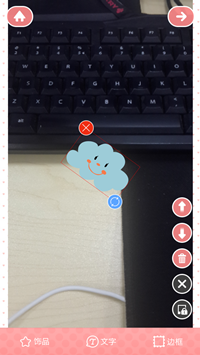
应用自带一部分默认素材,根据类别进入素材浏览界面,选中某一具体素材后,跳转至编辑界面,在编辑界面可对素材进行旋转,缩放,移动,删除操作,支持添加多个素材,最终保存。美图贴贴界面如下:
分析
BB猪冥思一想,有了初步方案:使用自定义View去实现道具的旋转,缩放,移动等基本操作。
自定义一个贴图控件StickerView,继承至View。StickerView模型图如下:
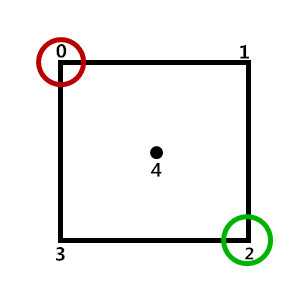
先定义4个常量分别表示:左上角删除按钮,右下角旋转缩放按钮,中心点,其他点。
public static final int CTR_LEFT_TOP = 0;
public static final int CTR_RIGHT_BOTTOM = 2;
public static final int CTR_MID_MID = 4;
public static final int CTR_NONE = -1;
public int current_ctr = CTR_NONE;
定义3个Bitmap:mainBmp , deleteBmp ,controlBmp分别对应素材图本身,删除按钮和旋转缩放按钮。
private Bitmap mainBmp , deleteBmp ,controlBmp ;
private int mainBmpWidth , mainBmpHeight , deleteBmpWidth , deleteBmpHeight , controlBmpWidth , controlBmpHeight ;
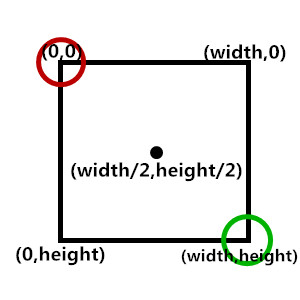
定义两个数组srcPs和dstPs,分别用于记录矩形转换(旋转,移动,缩放)前后的各点坐标。
private float[] srcPs, dstPs;
看下构造器,构造器中主要做两件事:传入素材图url和调用初始化方法initData
public StickerView(Context context , String imgPath){
    super(context);
    this.context = context ;
    this.imgPath = imgPath;
    initData(imgPath);
}
initData方法主要是初始化Bitmap和坐标数组:
private void initData(String imgPath) {
mainBmp = BitmapFactory.decodeFile(imgPath);
deleteBmp = BitmapFactory.decodeResource(this.context.getResources(), R.drawable.ic_f_delete_normal);
controlBmp = BitmapFactory.decodeResource(this.context.getResources(), R.drawable.ic_f_rotate_normal);
mainBmpWidth = mainBmp.getWidth();
mainBmpHeight = mainBmp.getHeight();
deleteBmpWidth = deleteBmp.getWidth();
deleteBmpHeight = deleteBmp.getHeight();
controlBmpWidth = controlBmp.getWidth();
controlBmpHeight = controlBmp.getHeight();

srcPs = new float[]{
        0, 0,
        mainBmpWidth, 0,
        mainBmpWidth, mainBmpHeight,
        0, mainBmpHeight,
        mainBmpWidth / 2, mainBmpHeight / 2
};
dstPs = srcPs.clone();

matrix = new Matrix();

// 平移后中心点位置
prePivot = new Point(mainBmpWidth / 2, mainBmpHeight / 2);
// 平移前中心点位置
lastPivot = new Point(mainBmpWidth / 2, mainBmpHeight / 2);

// 上一次触摸点位置
lastPoint = new Point(0, 0);

paint = new Paint();

paintFrame = new Paint();
paintFrame.setColor(Color.WHITE);
paintFrame.setAntiAlias(true);

defaultDegree = lastDegree = computeDegree(new Point(mainBmpWidth, mainBmpHeight), new Point(mainBmpWidth / 2, mainBmpHeight / 2));

setMatrix(OPER_DEFAULT);
}
接下来看一下StickerView的绘制流程:
定义一个标志位isSelected,如果处于选中状态就显示边框和操作按钮,反之不显示。
public void onDraw(Canvas canvas) {
    if (!isActive) {
        return;
    }
    canvas.drawBitmap(mainBmp, matrix, paint);//绘制主图片
    if (isSelected) {
        drawFrame(canvas);//绘制边框,以便测试点的映射
        drawControlPoints(canvas);//绘制控制点图片
    }

}
绘制边框
  private void drawFrame(Canvas canvas) {
    canvas.drawLine(dstPs[0], dstPs[1], dstPs[2], dstPs[3], paintFrame);
    canvas.drawLine(dstPs[2], dstPs[3], dstPs[4], dstPs[5], paintFrame);
    canvas.drawLine(dstPs[4], dstPs[5], dstPs[6], dstPs[7], paintFrame);
    canvas.drawLine(dstPs[0], dstPs[1], dstPs[6], dstPs[7], paintFrame);
}
绘制操作按钮
private void drawControlPoints(Canvas canvas) {
    canvas.drawBitmap(deleteBmp, dstPs[0] - deleteBmpWidth / 2, dstPs[1] - deleteBmpHeight / 2, paint);
    canvas.drawBitmap(controlBmp, dstPs[4] - controlBmpWidth / 2, dstPs[5] - controlBmpHeight / 2, paint);
}
接下来就是重点了,StickerView的Touch事件处理:
若触摸点不在StickerView上并且不在删除按钮和旋转按钮上,则将StickerView设置为非选中状态并隐藏边框和操作按钮;
若触摸点在删除按钮上,则隐藏该素材;
若触摸点在旋转缩放按钮处,则进行旋转缩放操作;
若触摸点在StickerView的其他位置,则进行移动操作。
 public boolean onTouchEvent(MotionEvent event) {
    int evX = (int) event.getX();
    int evY = (int) event.getY();

    if (!isOnPic(evX, evY) && isOnCP(evX, evY) == CTR_NONE) {
        isSelected = false;
        invalidate();
    } else if (isOnCP(evX, evY) == CTR_LEFT_TOP) {
        isActive = false;
        invalidate();
    } else {
        int operType = OPER_DEFAULT;
        operType = getOperationType(event);

        switch (operType) {
            case OPER_TRANSLATE:
                if (isOnPic(evX, evY)) {
                    translate(evX, evY);
                }
                break;
            case OPER_ROTATE:
                rotate(event);
                scale(event);
                break;
        }

        lastPoint.x = evX;
        lastPoint.y = evY;

        lastOper = operType;
        isSelected = true;
        invalidate();
    }

    return true;
}
判断触摸点是否在贴图上
private boolean isOnPic(int x, int y) {
    // 获取逆向矩阵
    Matrix inMatrix = new Matrix();
    matrix.invert(inMatrix);

    float[] tempPs = new float[]{0, 0};
    inMatrix.mapPoints(tempPs, new float[]{x, y});
    if (tempPs[0] > 0 && tempPs[0] < mainBmp.getWidth() && tempPs[1] > 0 && tempPs[1] < mainBmp.getHeight()) {
        return true;
    } else {
        return false;
    }
}
判断点所在的控制点
private int isOnCP(int evx, int evy) {
    Rect rect = new Rect(evx - controlBmpWidth / 2, evy - controlBmpHeight / 2, evx + controlBmpWidth / 2, evy + controlBmpHeight / 2);
    int res = 0;
    for (int i = 0; i < dstPs.length; i += 2) {
        if (rect.contains((int) dstPs[i], (int) dstPs[i + 1])) {
            return res;
        }
        ++res;
    }
    return CTR_NONE;
}
定义StickerView的操作类型:移动,旋转,缩放,选择
public static final int OPER_DEFAULT = -1;      //默认
public static final int OPER_TRANSLATE = 0;     //移动
public static final int OPER_SCALE = 1;         //缩放
public static final int OPER_ROTATE = 2;        //旋转
public static final int OPER_SELECTED = 3;      //选择
public int lastOper = OPER_SELECTED;

private int getOperationType(MotionEvent event) {

    int evX = (int) event.getX();
    int evY = (int) event.getY();
    int curOper = lastOper;
    switch (event.getAction()) {
        case MotionEvent.ACTION_DOWN:
            current_ctr = isOnCP(evX, evY);
            if (current_ctr != CTR_NONE || isOnPic(evX, evY)) {
                curOper = OPER_SELECTED;
            }
            break;
        case MotionEvent.ACTION_MOVE:
            if (current_ctr == CTR_LEFT_TOP) {
                // 删除饰品
            } else if (current_ctr == CTR_RIGHT_BOTTOM) {
                curOper = OPER_ROTATE;
            } else if (lastOper == OPER_SELECTED) {
                curOper = OPER_TRANSLATE;
            }
            break;
        case MotionEvent.ACTION_UP:
            curOper = OPER_SELECTED;
            break;
        default:
            break;
    }
    return curOper;

}
通过Matrix实现移动,旋转,缩放:
private void translate(int evx, int evy) {

    prePivot.x += evx - lastPoint.x;
    prePivot.y += evy - lastPoint.y;

    deltaX = prePivot.x - lastPivot.x;
    deltaY = prePivot.y - lastPivot.y;

    lastPivot.x = prePivot.x;
    lastPivot.y = prePivot.y;

    setMatrix(OPER_TRANSLATE); //设置矩阵

}

private void scale(MotionEvent event) {

    int pointIndex = current_ctr * 2;

    float px = dstPs[pointIndex];
    float py = dstPs[pointIndex + 1];

    float evx = event.getX();
    float evy = event.getY();

    float oppositeX = 0;
    float oppositeY = 0;

    oppositeX = dstPs[pointIndex - 4];
    oppositeY = dstPs[pointIndex - 3];

    float temp1 = getDistanceOfTwoPoints(px, py, oppositeX, oppositeY);
    float temp2 = getDistanceOfTwoPoints(evx, evy, oppositeX, oppositeY);

    this.scaleValue = temp2 / temp1;
    symmetricPoint.x = (int) oppositeX;
    symmetricPoint.y = (int) oppositeY;
    centerPoint.x = (int) (symmetricPoint.x + px) / 2;
    centerPoint.y = (int) (symmetricPoint.y + py) / 2;
    rightBottomPoint.x = (int) dstPs[8];
    rightBottomPoint.y = (int) dstPs[9];
    Log.i("img", "scaleValue is " + scaleValue);
    if (getScaleValue() < (float) 0.5 && scaleValue < (float) 1) {
        // 限定最小缩放比为0.5
    } else {
        setMatrix(OPER_SCALE);
    }
}

private void rotate(MotionEvent event) {

    if (event.getPointerCount() == 2) {
        preDegree = computeDegree(new Point((int) event.getX(0), (int) event.getY(0)), new Point((int) event.getX(1), (int) event.getY(1)));
    } else {
        preDegree = computeDegree(new Point((int) event.getX(), (int) event.getY()), new Point((int) dstPs[8], (int) dstPs[9]));
    }
    setMatrix(OPER_ROTATE);
    lastDegree = preDegree;
}

private void setMatrix(int operationType) {
    switch (operationType) {
        case OPER_TRANSLATE:
            matrix.postTranslate(deltaX, deltaY);
            break;
        case OPER_SCALE:
            matrix.postScale(scaleValue, scaleValue, dstPs[CTR_MID_MID * 2], dstPs[CTR_MID_MID * 2 + 1]);
            break;
        case OPER_ROTATE:
            matrix.postRotate(preDegree - lastDegree, dstPs[CTR_MID_MID * 2], dstPs[CTR_MID_MID * 2 + 1]);
            break;
    }

    matrix.mapPoints(dstPs, srcPs);
}
最后看下素材的添加保存流程:在主界面点击素材按钮进入素材选择界面,选中素材后通过onActivityResult获取图片url,初始化StickerView,并通过addView方法添加至容器中,并通过ArrayList
private Bitmap createBitmap(Bitmap src, Bitmap dst, float[] centerPoint, float degree, float scaleValue) {
if (src == null) {
    return null;
}
int w = src.getWidth();
int h = src.getHeight();
DisplayMetrics metric = new DisplayMetrics();
getWindowManager().getDefaultDisplay().getMetrics(metric);
int width = metric.widthPixels;     // 屏幕宽度(像素)
float scale = (float) w / (float) width;

int ww = dst.getWidth();
int wh = dst.getHeight();

float Ltx = centerPoint[0] - img.getLeft() - ww * scaleValue / 2;
float Lty = centerPoint[1] - img.getTop() - wh * scaleValue / 2;

Bitmap newb = Bitmap.createBitmap(w, h, Bitmap.Config.ARGB_8888);//创建一个新的和SRC长度宽度一样的位图
Canvas cv = new Canvas(newb);
cv.drawBitmap(src, 0, 0, null);//在 0,0坐标开始画入src

// 定义矩阵对象
Matrix matrix = new Matrix();
matrix.postScale(scaleValue, scaleValue);
//matrix.postRotate(degree);
cv.save();
cv.rotate(degree, centerPoint[0], centerPoint[1]);
Bitmap dstbmp = Bitmap.createBitmap(dst, 0, 0, dst.getWidth(), dst.getHeight(),
        matrix, true);
cv.drawBitmap(dstbmp, Ltx * scale, Lty * scale, null);//在src画贴图
//cv.save( Canvas.ALL_SAVE_FLAG );//保存
cv.restore();//存储
return newb;
}
项目地址:https://github.com/ckj375/Android-Sticker.git
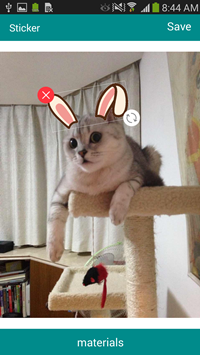
效果图:
